Managing access control policies and PDPs with Cerbos Hub
Previously we published the Get started with Cerbos Hub article where we covered the basics of setting up Cerbos Hub with your policy repository and Cerbos PDP. Then we published the article Authorize on the edge with Cerbos Hub and Embedded PDP bundles where we explored how Embedded PDPs can be utilized within Cerbos Hub to streamline and optimize authorization at the edge. Expanding on that, this post focuses on how to manage your access rules efficiently with Cerbos Hub.
Cerbos Hub streamlines the process of synchronizing access control rules across your apps and services. The tool facilitates collaboration and quick adaptation to changes in app requirements, making the management of access control simpler and more efficient.
In this piece, we’ll walk through a common use case; a simple SaaS application, CerbFinance, with multiple user roles and permissions. And you’ll see how Cerbos Hub manages the changes in policy definitions, making the changes available in the application in real-time.
Tutorial Setup
To follow this tutorial, make sure to set up the Cerbos Hub and connect the Cerbos PDP to the Hub. Fork the demo repository https://github.com/cerbos/cerbos-hub-showcase, check the `README`, then follow the instructions in the Get started with Cerbos Hub, with a single exception:
Instead of pasting the workspace and client credentials in the configuration yaml file, there is a `.env.example` file under the `infra/docker/` path of the forked project.
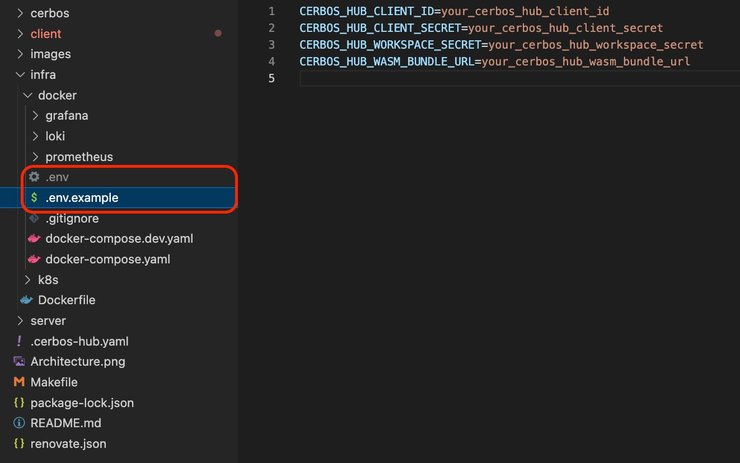
Copy that file and rename it to `.env` on the same path and paste the values of client ID, client secret, and `workspace secret` fields.
To get the WASM bundle URL, go to the `Decision points` page in the sidebar, and select the `Embedded` tab.

Copy the Bundle URL and paste it to your `.env` file.
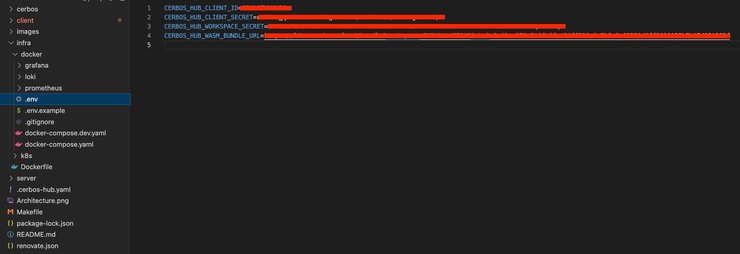
To start the application run the `make start` command in your terminal.
For full instructions on how to deal with Embedded PDPs, read the Authorize on the edge with Cerbos Hub and Embedded PDP bundles article.
How policies are defined
Our example application is an expense tracking system, in which a user named Frank, a member of the finance team, can view certain sections of the application and perform specific actions, while Finance Managers, and admins have broader access. For this use case, we’ll showcase a dynamic RBAC (role-based-access control) model, where levels of access for users (such as restricting approval rights for expenses) vary depending on the expense status and amount, as well as the user placement in the company hierarchy.
The given SaaS application example shows how Cerbos Hub manages the policy update orchestration for an "expense" resource. The policy defines that:
- Finance managers can approve any open expense unless they own the expense.
- Team members have a monetary cap on what they can approve.
In our CerbFinance demo application, there is a “View as” dropdown in the top right corner where we can switch between users. We’ll go back and forth between the Finance Manager and the team member roles as we go through this tutorial.
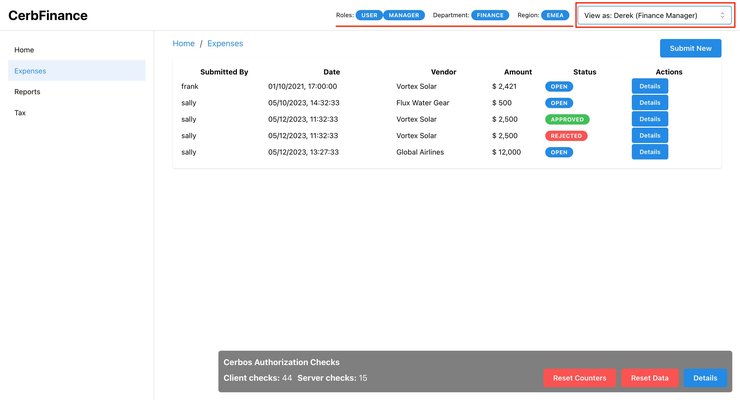
To understand who should be able to do what, we print the roles, departments, and region of the selected user just to the left of the dropdown itself. We have currently selected Derek. Derek is a Finance Manager of the EMEA region, and he is Frank’s supervisor.
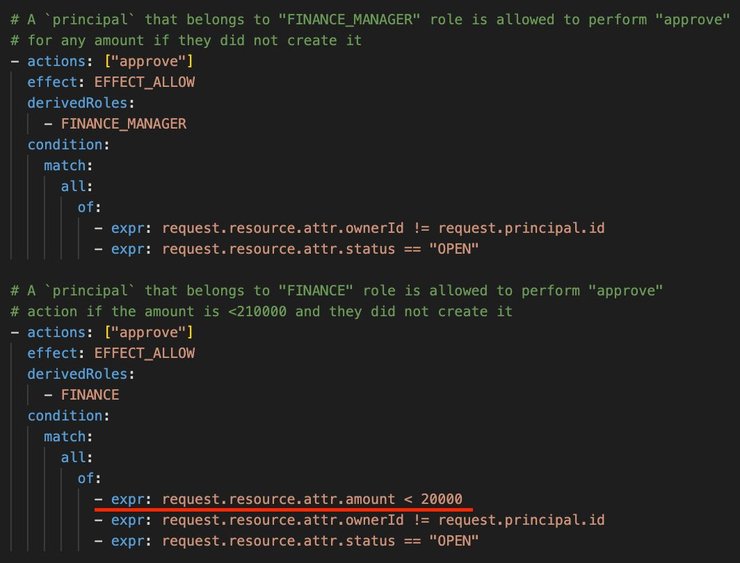
The policies definitions we set for this demo dictate that Finance team members are not allowed to do certain things that Finance Managers can do, such as: approve any expenses with an amount higher than $10,000.
Here is a snippet extracted from the policy definitions stating exactly that.
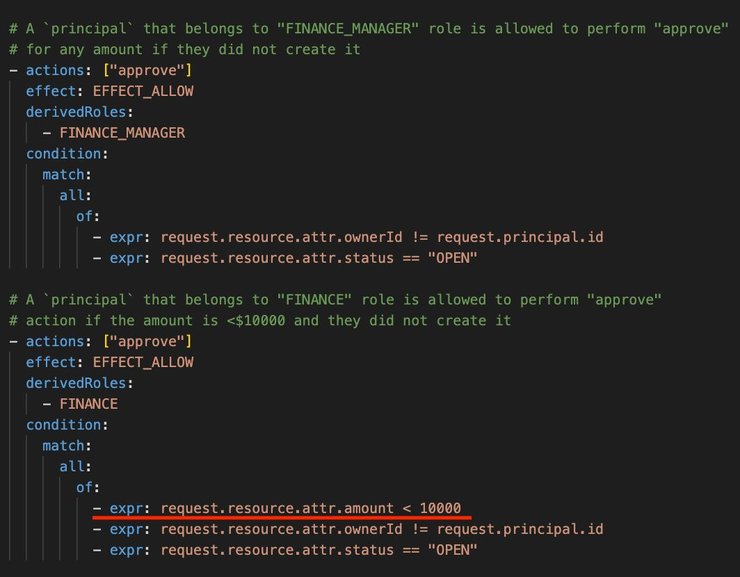
That means that Frank, our finance team member, can only approve expenses less than $10,000. For anything higher than that, a finance manager would need to be involved.
On the front end, what we see on the screenshot below is a list of expenses, alongside basic information such as who submitted the expense, when, the expense amount, the vendor, and the status.
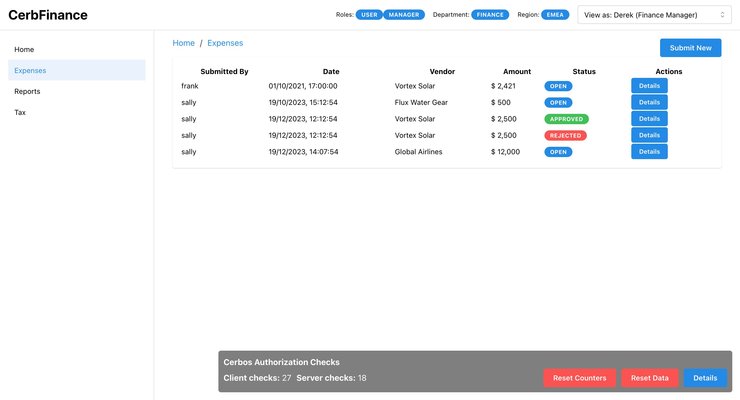
The far right column shows a `Details` button, which when opened shows us a modal with information on the expense. Actions that can be made against the expense appear as buttons at the bottom, which are colored if they are enabled and gray if they are not. This expense report was submitted by Sally, a sales manager at CerbFinance.
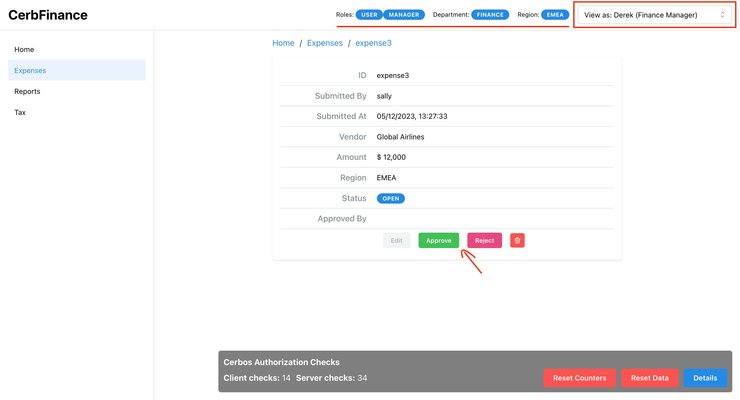
For Derek, all the actions except for ‘edit’ are enabled. The second we switch to Frank, things change.
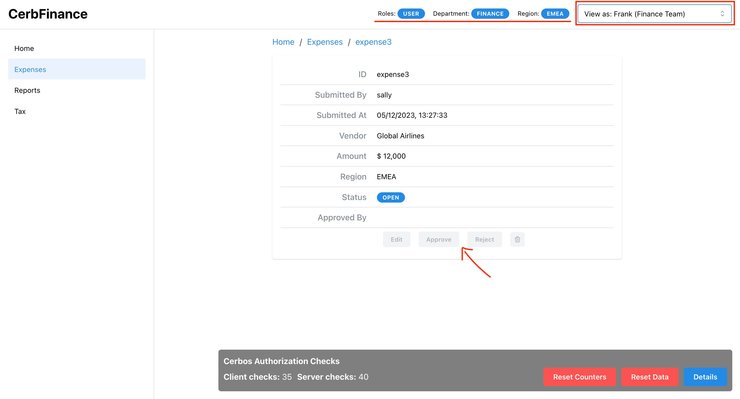
Because this expense is higher than $10,000, Frank does not have any of the action buttons enabled for him. Within our demo application, Frank (as anyone else) has specific permissions - he can enter certain areas and do particular tasks. But what if we decide to change these permissions?
Making changes to Policies
Take an instance where the company raises the limit for expense approvals by team members from $10,000 to $20,000. We start by making that change in the policy repository. Go to line 85 of `resource_expense.yaml` file located on `/cerbos/policies/`path, and replace the amount value 10000 with 20000. Save and push the change to the policy repository.
The second the update is made, Cerbos Hub starts an automated sequence of actions.
It kicks off the CI/CD pipeline to update the policies, runs tests to check for errors, and once it's all clear, sends out the updated policy across the system.
If any of the tests fail, the build will fail as well, and Cerbos Hub doesn’t send any changes to our Cerbos PDP instances. And we can see the failed tests on the `Builds` page of our Cerbos Hub workspace.
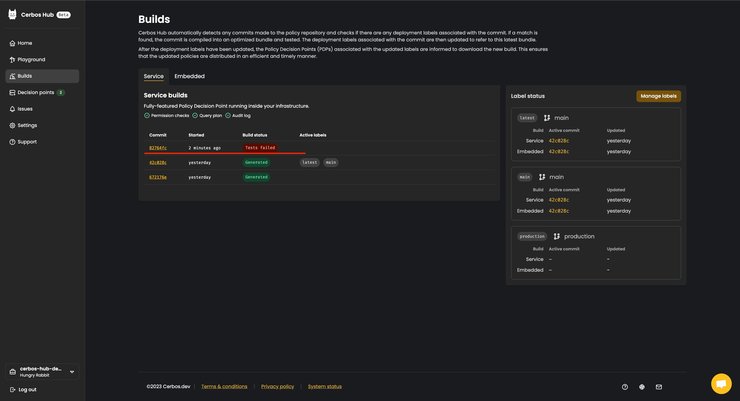
Click on the commit hash in the far left column. A new page will open, showing the exact test that failed and the details of the failure. In this case it failed because even though we made a policy change to enable finance team members to approve expenses up to the amount of $20,000, the test data is unchanged and still expects a failure.
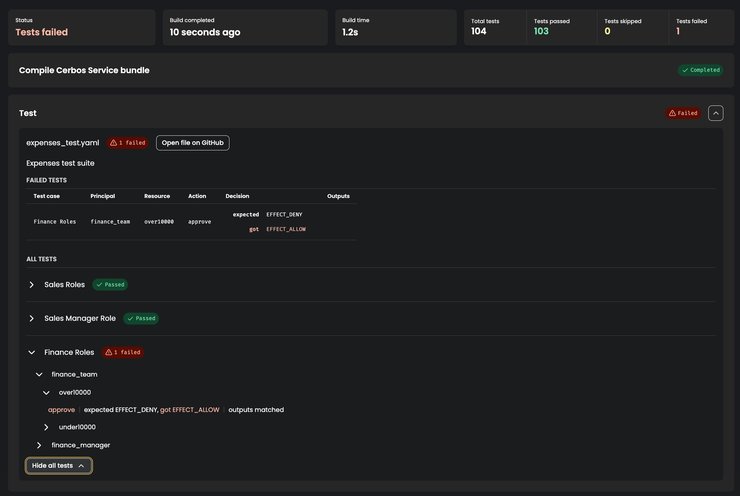
As it was an intended change, let’s update our tests so they reflect the newly expected behavior, and allow finance team members to approve expenses up to $20,000.
Cerbos Hub also lets us directly edit either the github commit or the commit file that caused the build to fail.
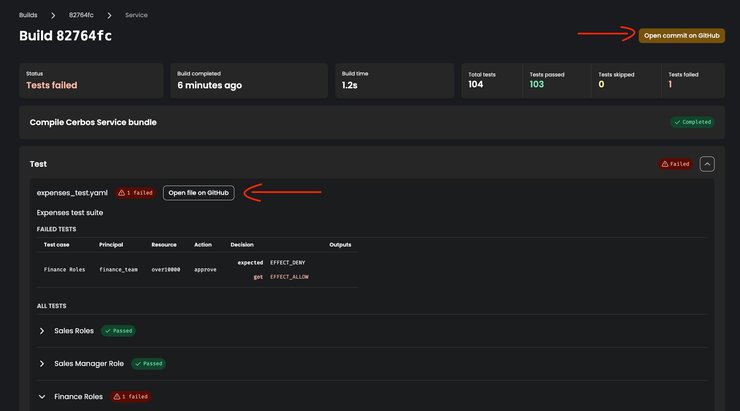
The quickest way to go around it is to go to the `expenses_test.yaml` file, and find line 240, where it defines the expected results for a finance_team principal approving an expense over $10,000. Replace `EFFECT_DENY` with `EFFECT_ALLOW` and push the changes.
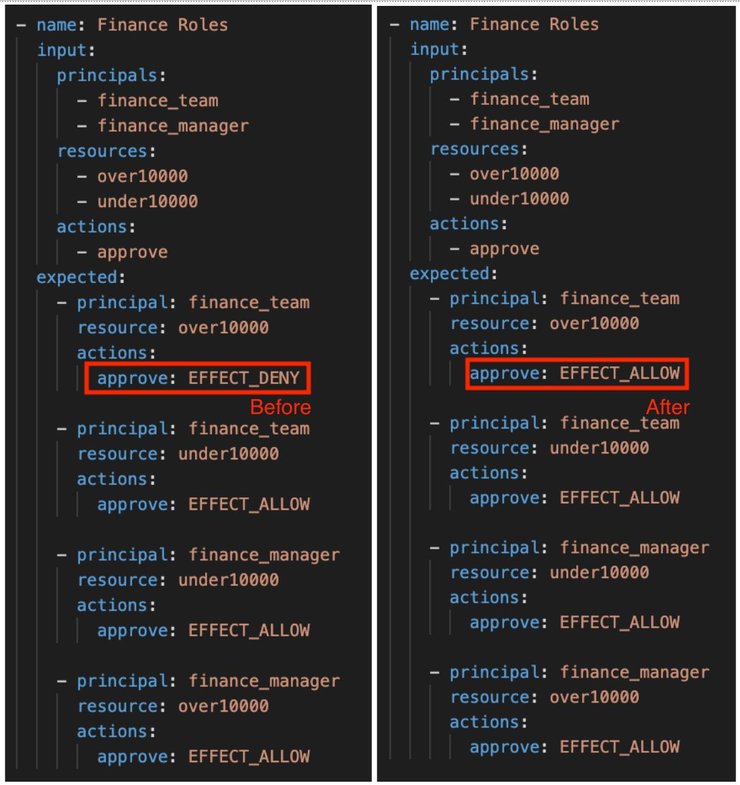
Cerbos Hub again starts the CI/CD pipeline to update the policies. And with tests successfully passing this time, it notifies all Cerbos PDP instances of the changes.

On the Decision points page, we can see that the PDP instance is running with the newly built bundle. We confirm this by noting that the latest successfully built commit hash is identical to the bundle hash.

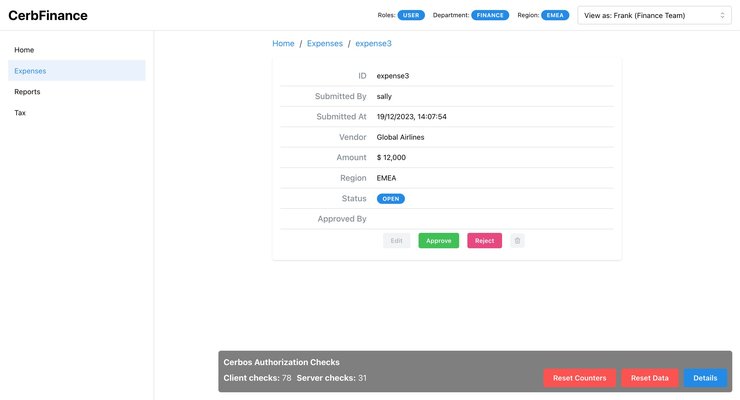
Going back to the front end, you can see that Frank’s view shows the approve/reject actions enabled for Sally’s expense report.
That’s it!
We’ve updated policies in real time. All we had to do is change the policy in our policy repository and make sure that the tests are passing. Cerbos Hub, upon successful build, notifies the Cerbos PDP instances of the change, now allowing Frank to approve the expenses with an amount set to up to $20,000.
This system-wide update happens smoothly, without stopping services or manual updates, ensuring the CerbFinance application keeps running without a hitch.
Join the Beta
Cerbos has launched Cerbos Hub to provide a robust, dynamic, and automated authorization management system. In the provided demo, we witness how effortlessly policies can be updated and enforced in a SaaS application, reflecting changes in real-time without any downtime or deployment hassle.
The Cerbos PDP ensures that authorization logic is transparent, version-controlled, and easy to manage. Cerbos Hub's managed service extends this power, seamlessly integrating with development workflows, providing real-time updates, and ensuring that authorization decisions are made efficiently everywhere, even at the edge.
If you haven't already, join the beta now and save months of developing access control in-house.
Book a free Policy Workshop to discuss your requirements and get your first policy written by the Cerbos team