Authorize on the edge with Cerbos Hub and Embedded PDP bundles
In our previous article, Get started with Cerbos Hub, we covered the basics of setting up Cerbos Hub with your policy repository and Cerbos PDP. Expanding on that, this post focuses on Embedded PDPs, a feature essential for managing authorization in distributed applications. We explore how Embedded PDPs can be utilized within Cerbos Hub to streamline and optimize authorization at the edge.
While Cerbos PDPs are deployed within your own infrastructure, Embedded PDP bundles offer a way to run code across multiple web environments efficiently. Cerbos Hub, which enables the usage of Embedded PDPs, lets you deploy authorization logic closer to user interactions, even further reducing latency and improving performance.
Set up embedded PDP bundles in Cerbos Hub
Upon every change pushed on your policy repository, Cerbos Hub starts an automated sequence of actions. It starts the CI/CD pipeline, runs tests to check for errors, and sends out the updated policy across the system once it's all clear.
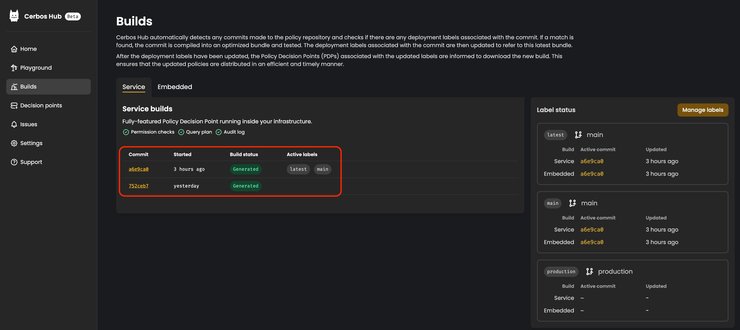
As we showed in our Get started piece, all of the labels and options provided in configuration are recognized by automated Cerbos Hub processes when each build is generated. The screenshot below shows an example of how your Builds page should look when the build is successful.

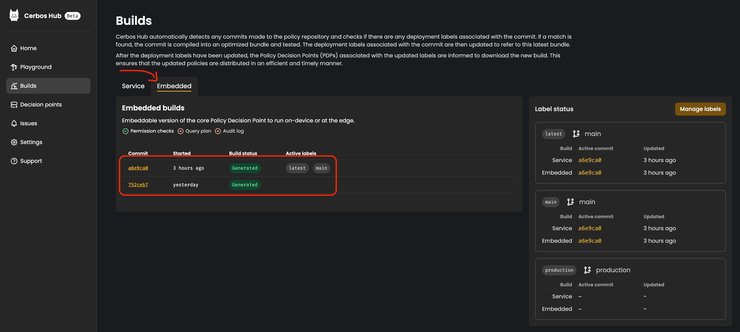
The build shown above is a fully-featured Cerbos PDP - which would be running inside your infrastructure. For embedded builds, click on the `Embedded` tab, right next to the active `Service` tab.
Upon selecting `Embedded` builds, you can see all the successful builds for embeddable versions of the Cerbos PDP that you can run on-device or at the edge. That is what we refer to as an Embedded PDP bundle.

Embedded PDPs are a WebAssembly (WASM) compiled version of your policies. To use it in your application do the following:
Go to the `Decision points` page in the sidebar, and select the `Embedded` tab.

You will see a list of labels configured in your cerbos-hub setup. The builds generated by Cerbos Hub are pushed to the CDN (content delivery network). Selected on the screenshot below is the value of `Bundle URL`, which represents the location where the generated build was pushed.
Whenever there is a new build pushed to the CDN, the original URL will redirect to the new one. That means that there is no need for you to update the URL in your application, as Cerbos Hub will handle the redirect for you.

Add an Embedded PDP Bundle to your application
Let’s say you are in the middle of developing a simple Node.js application, and you want to use an embedded PDP to handle your application permissions.
In order to work with embedded Cerbos PDP Bundles, the first thing to do is install it in your application.
(Check the npm package page for more details.)
npm install @cerbos/embeddedWhen you’re done, go back to the Decision points page of Cerbos Hub. Select the embedded tab, and copy the Bundle URL.

Then, you can define a file name, for example `cerbos.edge.ts`, which will create a Cerbos instance linked to the Bundle URL you just copied, similarly to the following:
import { Embedded } from "@cerbos/embedded";

export let cerbos = new Embedded(
  fetch("PASTE_THE_BUNDLE_URL_YOU_COPIED_HERE"),
);
We know that Cerbos Hub pushes out updates automatically. But to make sure your embedded instances are staying up to date, set up your application to do periodic checks.
You can achieve this in many ways, with dynamic polling, using websockets, etc.
As that is not the core part of this tutorial, we’ll use a quick hack that we do not recommend for you to use in your production applications:
setInterval(() => {
  cerbos = new Cerbos(fetch(embeddedPdp));
}, 1000 * 30);
Now, wherever in your application you need to run permission checks against your policy repository, you can import the previously exported `cerbos` field. Like so:
import { cerbos } from "./cerbos.edge";Then you simply make a call to Cerbos, passing the user (principal), resource that is being accessed, and actions used to access the resource, and your embedded Cerbos PDP will serve you an ALLOW or DENY. It’s necessary to ensure that all of the relevant resource and principal data is available to the client-side in order to do the permission checks.
await cerbos.isAllowed({
  principal: {
    id: "user@example.com",
    roles: ["USER"],
    attr: { tier: "PREMIUM" },
  },
  resource: {
    kind: "document",
    id: "1",
    attr: { owner: "user@example.com" },
  },
  action: "view",
}); // => true
That’s it! You can now check permissions from server-side Node.js and browser-based applications.
To Conclude
Incorporating Cerbos Hub's embedded PDP bundle into your application architecture enhances authorization processes by deploying them at the edge. This approach not only reduces latency and improves performance but also streamlines policy management and enforcement. By integrating Cerbos Hub with your application, you gain the ability to execute real-time permission checks, further reducing backend dependencies and improving overall application efficiency.
For software engineers, the implementation of Cerbos Hub's embedded PDP bundles represents a practical and efficient solution to complex authorization challenges. This approach simplifies the deployment and update process of authorization logic, enabling developers to focus more on core application development and less on access control management.
Book a free Policy Workshop to discuss your requirements and get your first policy written by the Cerbos team